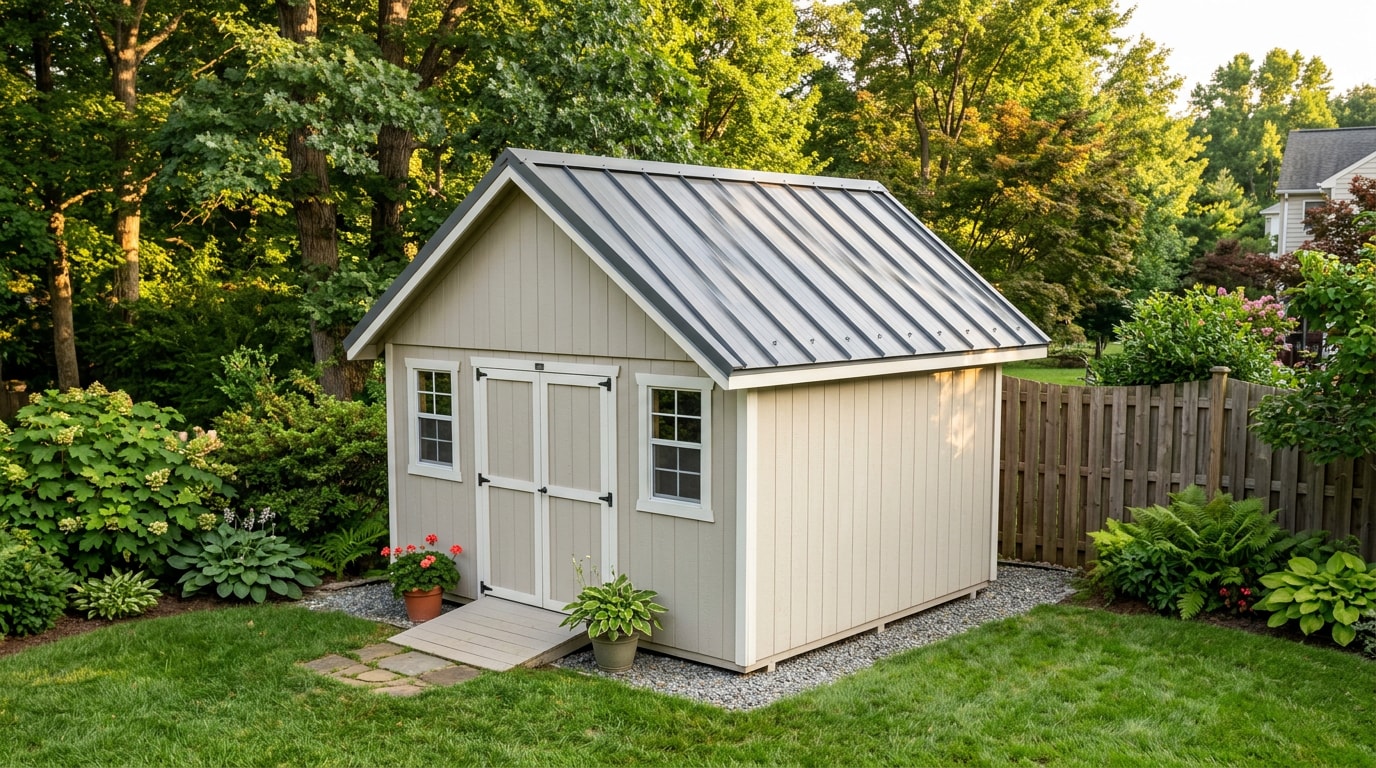
Installing metal roofing on a shed in Gainesville, VA means trading a roof that needs replacing every 15-20 years for one that can outlast the shed itself. This guide covers permits, slope rules, tools, and the full panel-by-panel install process, plus the Prince William County code details homeowners actually run into. Here's what separates a roof that lasts 50 years from one that leaks by spring.
The crews at Style Installation Inc work on roofs throughout Northern Virginia, including Gainesville, Manassas, and Woodbridge, and sheds are where we see the most avoidable mistakes: wrong slope for the panel type, screws driven through the rib instead of the flat, and skipped permits that turn into a headache at resale.
Do You Need a Permit for a Shed Roof in Gainesville, VA?
Gainesville falls under Prince William County, and the county's rules are specific about accessory structures like sheds.
Zoning approval is required for every shed in the county, no matter the size. A building permit is also required once the structure passes a certain size threshold. According to Prince William County's Development Services office, zoning approval is mandatory for all sheds regardless of size, while a building permit is required once a shed exceeds 256 square feet of building area.
If you're re-roofing an existing shed rather than building a new one, call the county's Building Development Division at (703) 792-4040 before you start. Smaller accessory structures are often exempt from a building permit for a roofing material swap, but confirming takes two minutes and saves a stop-work order later.
If you'd rather hand off the paperwork along with the panels, get a free estimate and we'll flag any permit questions specific to your Gainesville, VA property before work starts.
Checking Your Shed's Slope and Structure for Metal Roofing
Before buying a single panel, confirm your roof's slope actually qualifies for the panel type you want. This is the step most DIY guides gloss over, and it's the one that causes callbacks.
Per the International Residential Code, minimum slopes for metal roof panels break down by panel type:
- Lapped, non-soldered panels without sealant: 3:12 minimum
- Lapped, non-soldered panels with applied lap sealant: 1/2:12 minimum
- Standing-seam systems installed per manufacturer specs: 1/4:12 minimum
These figures come straight from the code guidance compiled by the Department of Energy's Building America Solutions Center. Manufacturer installation instructions can still set a stricter minimum than code, so check the panel spec sheet before you order.
Gainesville's mix of heavy spring rain and occasional wet, heavy snow is a good reason to build in extra margin rather than install at the bare legal minimum, especially on an exposed-fastener corrugated panel.
Structure matters just as much as slope. Check the existing deck for soft spots, rot, or sagging before deciding whether old roofing needs to come off entirely.
If the plywood flexes underfoot or shows water staining, replace those sections. Metal panels won't hide a weak deck, and fastener holding power depends on solid framing underneath. If the whole deck is shot, a full roof tear off is usually cheaper in the long run than patching around rot.
Why Metal Roofing Outperforms Asphalt and Wood on a Shed
Sheds take a beating from sun, rain, and the occasional falling branch, usually with less upkeep attention than the main house gets.
Metal panels shrug off that neglect better than asphalt shingles or wood shakes. The upfront cost is higher, but the math changes once you look past year one.
| Material | Average Lifespan | Installed Cost per Sq. Ft. (2026) | Maintenance Level |
|---|---|---|---|
| Metal panels | 40-70 years | $5-$12 | Low, occasional rinse and fastener check |
| Asphalt shingles | 15-20 years | $1-$4 | Moderate, algae, granule loss, resealing |
| Wood shingles/shakes | 15-25 years | $4-$8 | High, rot, pests, periodic treatment |
A metal roof's reflectivity also cuts down on summer heat buildup inside the shed, which matters if you use it as a workshop. Light-colored, reflective finishes still perform this job even though the EPA retired the formal Energy Star roofing certification back in 2022; the Department of Energy's current guidance on cool roof products is a solid reference for how reflectance and emissivity actually affect indoor temperature.
If you'd rather have a professional handle the comparison and the install, our roofing contractor team can walk through panel options suited to your shed's size and budget, including full roof installation if the shed is tied into a larger property project.
Keep in mind the cost figures above are regional averages. Exact pricing shifts with panel gauge, finish, and current material costs.
Tools and Materials You'll Need
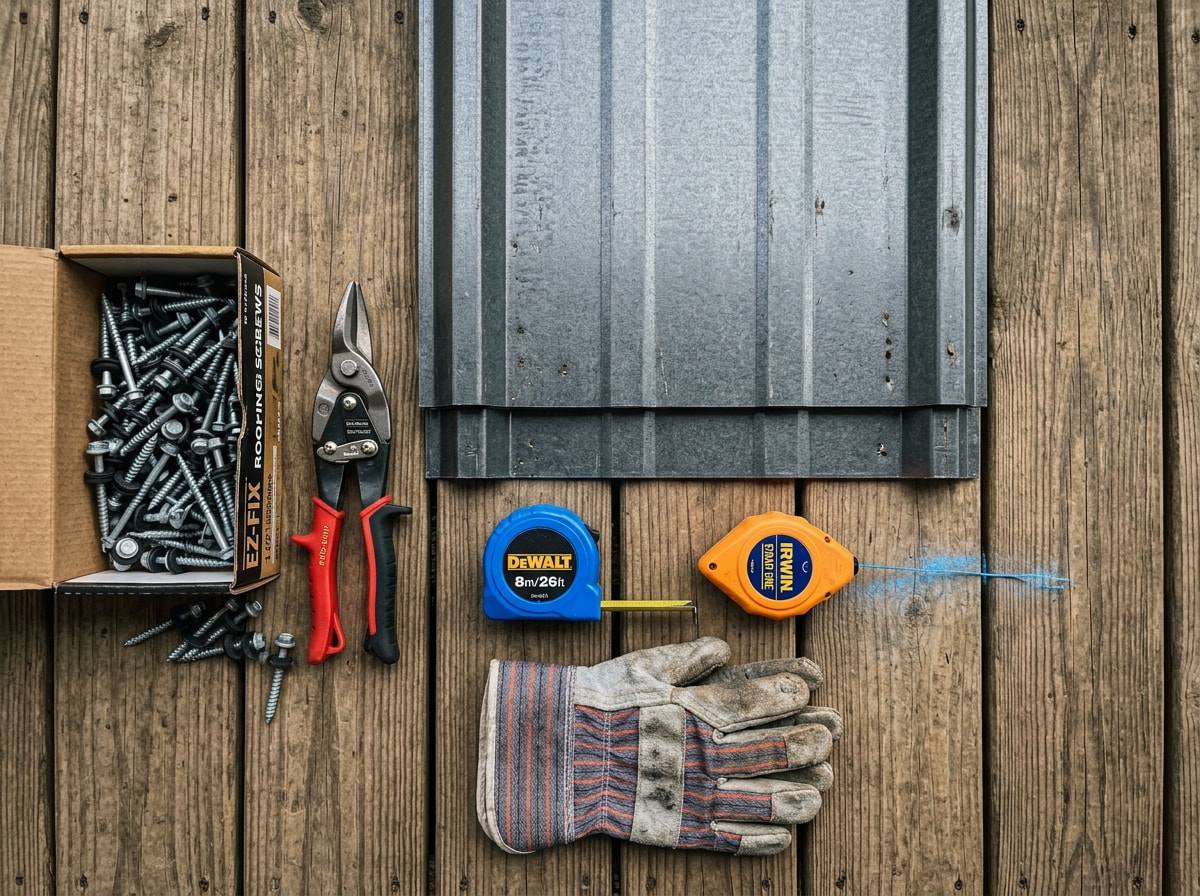
Gather everything before you start. It saves multiple hardware store trips mid-project.
Tools:
- Drill/driver with a screw-gun bit
- Tin snips or a circular saw fitted with a metal-cutting blade
- Tape measure and chalk line
- Ladder and roof jacks or stabilizers
- Work gloves and cut-resistant sleeves
Materials:
- Metal roofing panels, plus one extra panel to cover mistakes or waste
- Rubber washer screws rated for exterior use
- Synthetic underlayment
- Eave and rake drip edge
- Foam closure strips
- Ridge cap
- Butyl tape or compatible roofing sealant
Buying one additional panel beyond your measured square footage is cheap insurance against a bad cut late in the day.
Measuring the Roof and Cutting the Panels
Measure each roof slope separately. Multiply length by width to get square footage, then divide by 100 to convert to roofing squares for ordering.
Order full-length panels whenever the slope allows it. Avoiding horizontal seams removes one of the most common leak points on a shed roof.
When panels need trimming for width or to fit around vents, tin snips work fine for occasional cuts. A circular saw with a metal-specific blade is faster for a full roof's worth of cutting.
Wear gloves either way. Freshly cut metal edges are sharp enough to slice through a careless hand.
Installing Drip Edge Along the Eaves
Drip edge goes down before the underlayment at the eaves. Fasten it roughly every 16 inches with about a half-inch overlap between pieces.
This keeps water running off the roof's edge instead of wicking back under the panels and into the fascia.
Once the underlayment is in place, a second piece of drip edge, the rake-edge type, goes on top along the gable ends. This layered approach protects both the eave trim and the fascia from the kind of slow rot that's hard to spot until it's already a problem.
Installing Underlayment and Closure Strips
Start the underlayment at the eave and work upward, overlapping each course by roughly 4-6 inches so water always sheds onto the layer below rather than finding a seam.
Synthetic underlayment is generally preferred over traditional felt under metal roofing. Felt can soften in the heat metal panels absorb and bond to the panel underside over time, which makes future repairs messy.
Before setting the first panel, install foam closure strips along the eave. These fill the wavy gaps created by corrugated or ribbed panel profiles, blocking wind-driven rain and dust from pushing up underneath the roofing.
Skipping this step is a common reason sheds develop drafts or minor leaks along the lower edge within the first year.
Installing the Metal Panels: First Panel Through Final Course
Square the first panel carefully. Every following panel lines up off this one, and a slight misalignment compounds across the roof.
Overhang the eave by about an inch, then fasten through the flat part of the panel, never through the raised rib, driving screws into solid framing underneath.
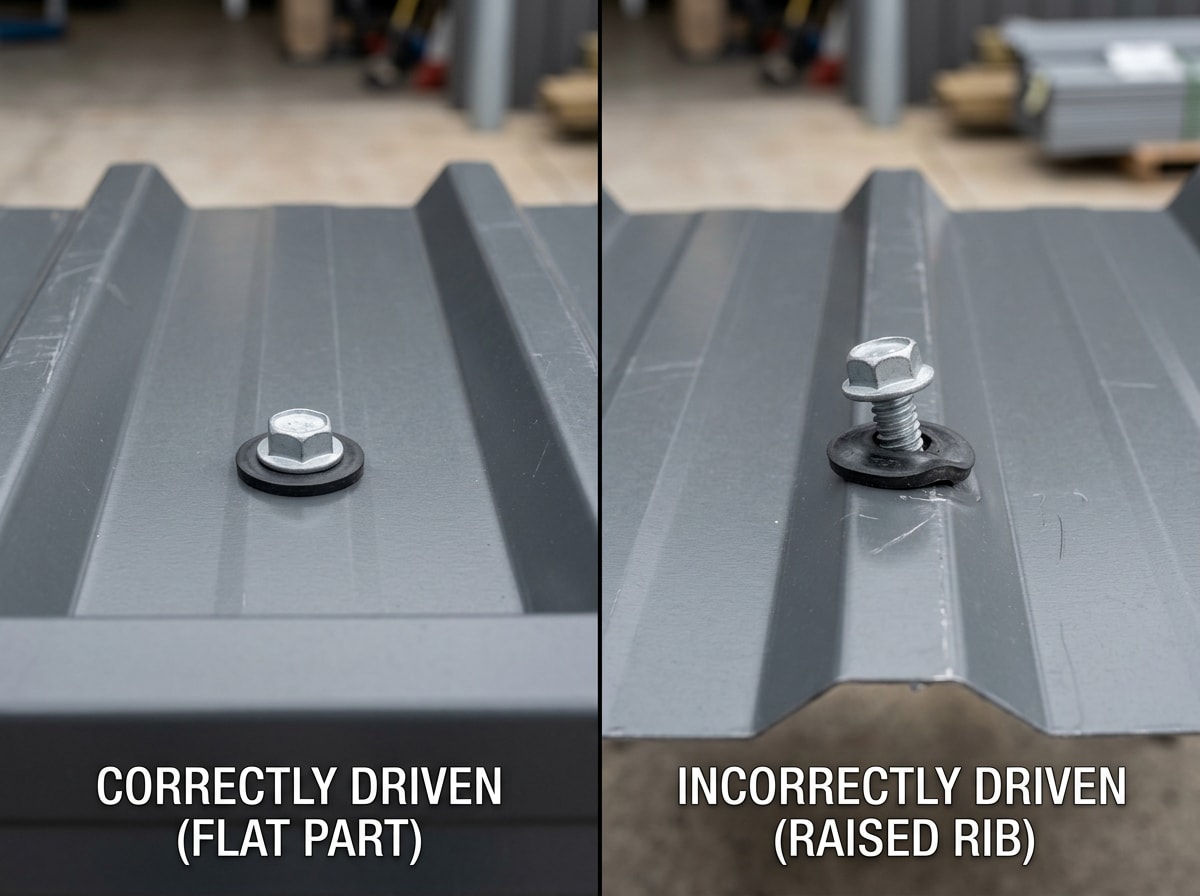
Work across the roof, overlapping each new panel by one full rib or corrugation over the last. Run a bead of sealant or a strip of butyl tape in that sidelap before fastening.
| Do This | Not That |
|---|---|
| Fasten through the panel's flat | Fasten through the rib (crushes the seal, invites leaks) |
| Overlap one full rib/corrugation | Overlap a partial rib (weak, inconsistent seal) |
| Seal every sidelap with butyl tape or sealant | Skip sealant on sidelaps to save time |
| Snug screws until the washer compresses slightly | Overdrive screws until the washer splits |
Keep screw spacing consistent, typically every 12 inches along the edges and on the flats between ribs. Check alignment every few panels rather than waiting until the end to notice drift.
Adding Ridge Caps and Finishing Touches
Before the ridge cap goes on, install foam closure strips along the peak on both sides, matching them to the panel profile underneath. These seal the gaps where panels meet at the top of the roof, keeping wind and rain from working their way in from above.
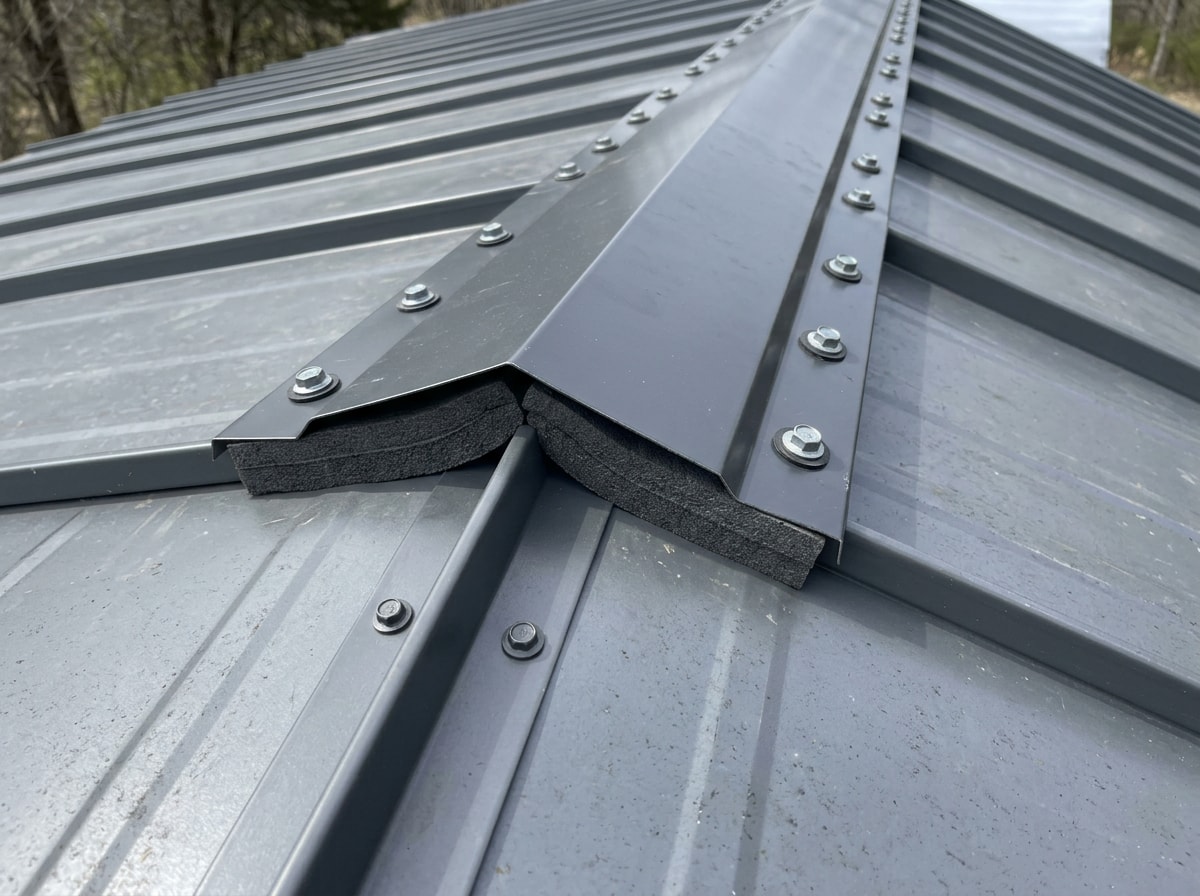
Fasten the ridge cap over the peak, overlapping it enough to fully cover the closure strips and the top edge of each panel run. This last step is usually what separates a roof that looks professionally done from one that just looks mostly finished.
If you get partway through a shed roof and decide it's not a weekend project after all, get a free estimate and we'll finish it from wherever you left off.
FAQ
Do I need a permit for a shed roof in Prince William County?
Zoning approval is required for every shed in Prince William County regardless of size. A building permit is also required once the shed exceeds 256 square feet. Re-roofing an existing shed under that size often doesn't trigger a separate building permit, but call the county's Building Development Division at (703) 792-4040 to confirm before you start.
What do you put under metal roofing on a shed?
Synthetic underlayment is the standard choice under metal roofing because it resists heat better than felt and won't bond to the panels over time. If the shed has open purlins instead of solid decking, a condensation-barrier product designed for that setup helps prevent moisture buildup on the panel undersides.
What is the minimum roof slope for metal roofing on a shed?
It depends on the panel system. Lapped panels without sealant need at least 3:12, lapped panels with applied lap sealant can go as low as 1/2:12, and standing-seam systems installed per manufacturer specs can go down to 1/4:12. Always confirm the manufacturer's spec sheet, since requirements vary by panel profile even within code limits.
Can you install metal roofing over existing shingles on a shed?
In many cases, yes, if the existing shingles lie flat, aren't curling, and the deck underneath is sound. A moisture barrier, either synthetic or felt, should go between the old shingles and the new metal panels regardless. Check local permit rules first, since some jurisdictions treat a roof-over differently than a full tear-off.
Is a metal roof on a shed noisy in the rain?
Less than most people expect, especially with solid decking and underlayment underneath. The underlayment and deck absorb most of the drumming sound that gives metal roofs their reputation for noise. A shed with open purlins and no solid sheathing will be noticeably louder than one built to the same standard as a house roof.
How long does it take to install a metal roof on a shed?
A typical 10x10 or 10x12 shed roof takes a DIYer a full weekend, including tear-off of old roofing if needed. A professional crew usually finishes the same job in under a day.
How much does it cost to install a metal roof on a shed?
For a typical 10x10 or 10x12 shed, expect roughly $4-$8 per square foot for corrugated panel materials, or $8-$14 per square foot for standing seam, with DIY labor saving most of the install cost. Hiring a professional for the same shed often runs $600-$1,500 total depending on panel type and roof complexity. If you'd rather skip the math, get a free estimate and we'll give you shed-specific numbers for your Gainesville property.